
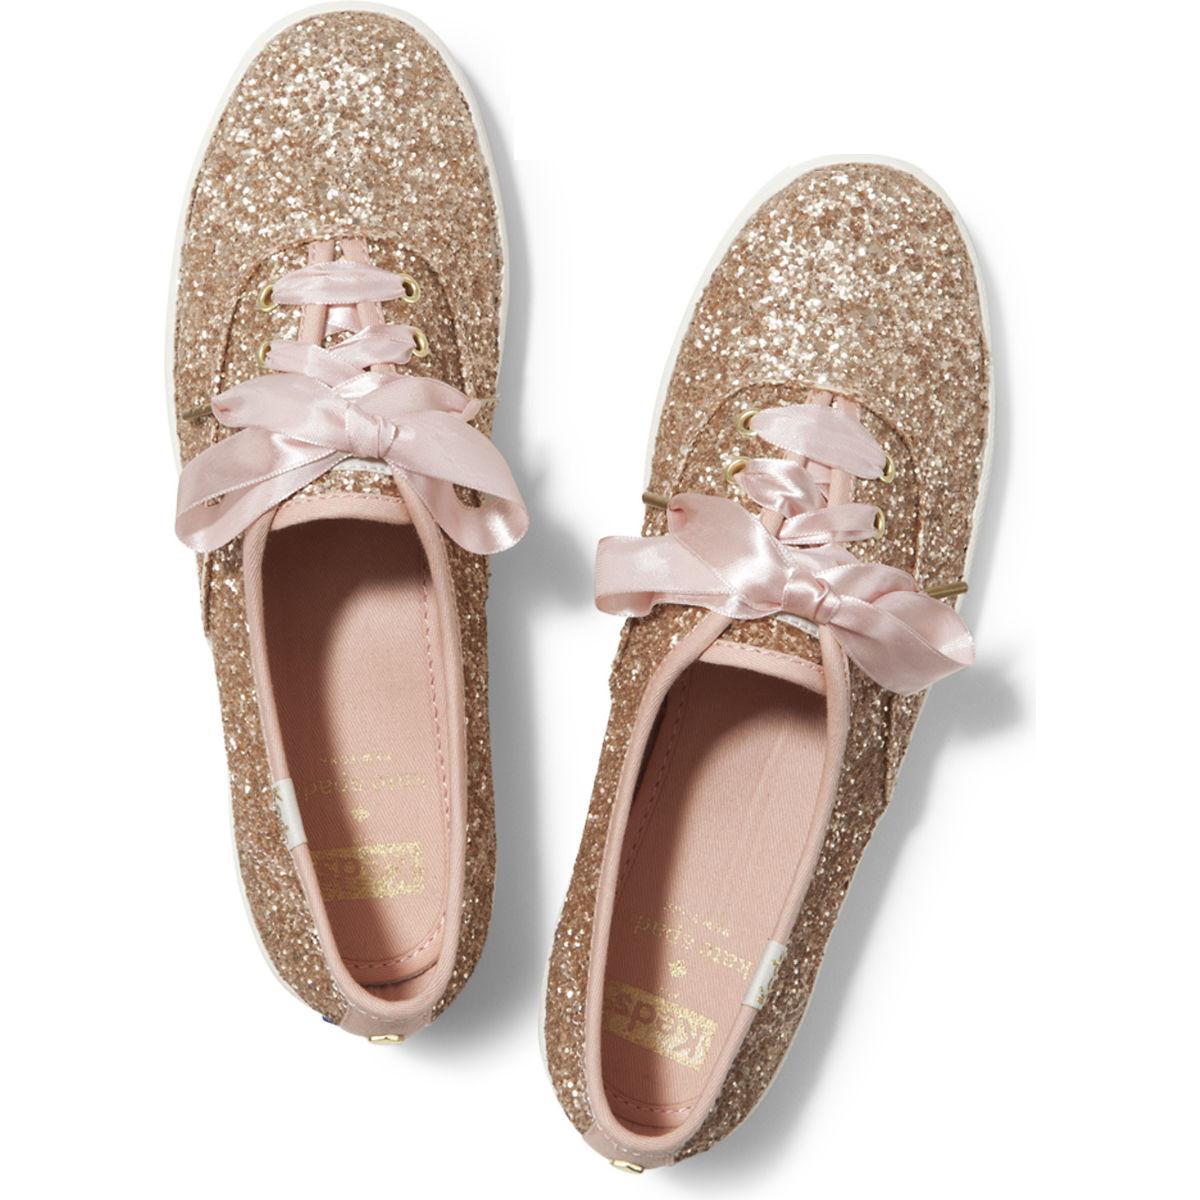
I saw this pair of Keds x Kate Spade rose gold glitter sneakers in Glorietta when we were in Manila 2 weeks ago. So cute diba? Pero mahalia. Well, not really, but I rarely wear sneakers to justify the cost.
When we came back here in Dumags, my favorite grocery was having a sneaker sale and I got pair of mangy-looking Atmosphere sneakers for 200 pesos. No wonder they were on sale. Hahahahaha. Actually, the shoes are okay, but the fabric's color has lightened already. It's not going to be a problem though, as I'm going to cover it in glitter. Another thing, I didn't try on the shoes before I bought them, as they came in my size, but when I got home, I discovered that they are way too big for me. Buti na lang kasya kay Sharkteeth, whose feet are two sizes bigger than mine!!!
I cleaned everything with isopropyl alcohol and I removed the insole. I wrapped the rubber parts with washi tape. Wala kasi akong masking tape. I also covered the eyelets with glue, so I can easily remove any glitter that might get stuck on it.

I mixed the glitter with fabric paint in a bowl. I used a small bottle of Leeho glitter and Leeho fabric glue/paint. I couldn't find a bottle of rose gold so I settled on this shade of metallic pink. The mixture was enough to coat the shoes twice, plus some more. If you have Mod Podge, you can use it instead of fabric glue.

Then I painted the fabric with the mixture. You can opt not to paint the edges. I did because lilac is much too light compared with the metallic pink. After drying the first layer, I again painted another layer.

After drying, I painted the entire glitter-covered surface with crafting glue. Again, if you have Mod Podge, you can use it instead of crafting glue. I left it to dry overnight.

The shoes were completely dry this morning. I brushed off loose glitters then sprayed the shoes with sealant for good measure. I left the shoes to dry for about an hour, then removed the glitters stuck on the eyelets with a nipper. I bought a pair of metallic silver shoestrings to make the shoes even more glittery, 'cause "They are too glittery," says Sharkteeth never.

Et voila!
 |
| I added a heart stud on each side. |
 |
I am thoroughly happy with the result, and even if the shoes didn't turn out to be mine, crafting them made me so happy! And of course, Bebe Ghel is so happy as well with her new shoes.
Materials needed:
1. a pair of canvas shoes
2. masking tape
3. small bottle of glitter
4. small bottle of fabric glue
5. round paint brush
6. crafting glue (Elmer's)
7. sealant
I already have tape, paint brush, crafting glue, and sealant in my craft stash, and my total spending was 275 pesos.
The queen of DIY strikes again hahahahaha Ikaw na mother! Love it!!! Pero mas winnur na naman si Sharkteeth ... ay Sam pala hahaha baka magalet
ReplyDeleteMedyo aligaga pa rin ako ng konti sa Keds x KS. Nuninuninuninu...
DeleteAng galing! From drab to fab! 8-)
ReplyDeleteThanks, Aggie!
DeleteGaling talaga ng mga DIY mo. Question lang, san kaya makakabili nung clear sealant? Meron kasi ako Modpodge pero hindi ko ung water proof kind.
ReplyDeleteThank you! Sa mga craft stores and hardwares. Yung acrylic sealant/top coat.
DeleteAng galing neto! Hindi ako masyadong marunong pag pagpapaint at pag iiba na ng kulay ng isang bagay. Pero gusto ko to pwd din ung mga ballet shoes.
ReplyDeleteOo nga, maganda ito sa ballet shoes. Madali lang naman, first time kong gawin ito and fairly okay naman yung output. Di kailangang perfect ang application kasi not meant to be flat naman yung paint, and kung may area man na manipis yung glitter, you can always add mo. Basta ang importante is that you cover all areas that are not going to be painted para madaling linisin after.
Deletecute sis! :)
ReplyDeleteThank you! Taga-GT ka?
DeleteAng ganda ng kinalabasan! Namiss ko magbasa ng DIY posts, thanks for this, TPS! :)
ReplyDeleteThank you. Gawa na. Ang dali lang. Okay ang effort/output ratio.
DeleteWow ito pala yun! Ang galing mo. Pero know what, na-stress ako. Yung pagcover pa lang ng part na hindi kukulayan, nastress na ako. Haayy, problema ng hindi crafty. Pero try ko ito gawin with my sis na medyo may talent dito para may aalalay sa akin. LOL
ReplyDeleteMics, so easy lang yung pag-cover. Just stick the tape like you normally would on any other surface.
DeleteI like it. galing mo! I'm inspired to do one for myself =)
ReplyDeleteThank you. Gawa na. So easy to make. Am thinking of making one again and mix gold and pink glitters, baka makuha ko ang rose gold na inaasam ko.
DeleteI would love to try this out since tipid mode ako ngayon! Hehe. BTW, I saw your blog's link on GT.
ReplyDeletePerfect project sa nagtitipid! :) Low cost, low effort, high satisfaction.
Delete