Showing posts with label DIYbyTPS. Show all posts

Sunday, February 07, 2016

The Kuripot Crafter Strikes Again: Glitter Sneakers

Hello! Hello! Hello! Aba, may free time ako. Anong himala?! Magugunaw na yata ang mundo. Hahahaha! At dahil dyan, crafting time. :) Off-topic na medyo related (ano daw?): My most viewed posts are the DIY Hermes Twilly and the home-made gourmet tuyo...such disparate things, no? But one thing is clear, there are so many DIY-ers out there.

I saw this pair of Keds x Kate Spade rose gold glitter sneakers in Glorietta when we were in Manila 2 weeks ago. So cute diba?  Pero mahalia. Well, not really, but I rarely wear sneakers to justify the cost.
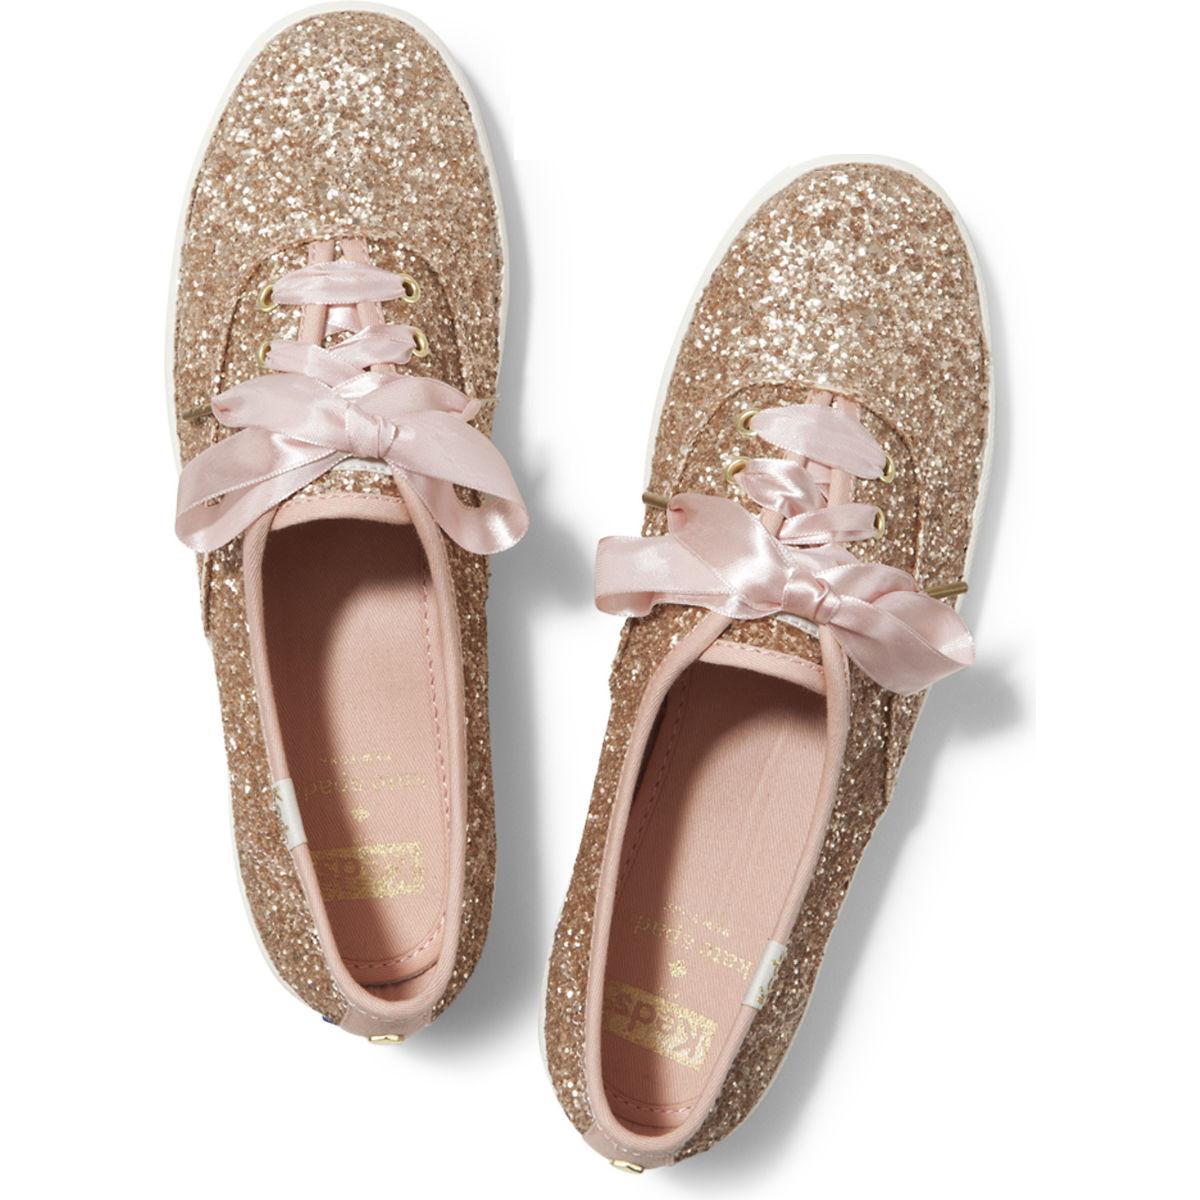


When we came back here in Dumags, my favorite grocery was having a sneaker sale and I got pair of mangy-looking Atmosphere sneakers for 200 pesos. No wonder they were on sale. Hahahahaha. Actually, the shoes are okay, but the fabric's color has lightened already. It's not going to be a problem though, as I'm going to cover it in glitter. Another thing, I didn't try on the shoes before I bought them, as they came in my size, but when I got home, I discovered that they are way too big for me. Buti na lang kasya kay Sharkteeth, whose feet are two sizes bigger than mine!!!

I cleaned everything with isopropyl alcohol and I removed the insole. I wrapped the rubber parts with washi tape. Wala kasi akong masking tape. I also covered the eyelets with glue, so I can easily remove any glitter that might get stuck on it.


I mixed the glitter with fabric paint in a bowl. I used a small bottle of Leeho glitter and Leeho fabric glue/paint. I couldn't find a bottle of rose gold so I settled on this shade of metallic pink. The mixture was enough to coat the shoes twice, plus some more. If you have Mod Podge, you can use it instead of fabric glue.


Then I painted the fabric with the mixture. You can opt not to paint the edges. I did because lilac is much too light compared with the metallic pink. After drying the first layer, I again painted another layer.


 After drying, I painted the entire glitter-covered surface with crafting glue. Again, if you have Mod Podge, you can use it instead of crafting glue. I left it to dry overnight.


The shoes were completely dry this  morning. I brushed off loose glitters then sprayed the shoes with sealant for good measure. I left the shoes to dry for about an hour, then removed the glitters stuck on the eyelets with a nipper. I bought a pair of metallic silver shoestrings to make the shoes even more glittery, 'cause "They are too glittery," says Sharkteeth never.


 Et voila!

I added a heart stud on each side.


I am thoroughly happy with the result, and even if the shoes didn't turn out to be mine, crafting them made me so happy! And of course, Bebe Ghel is so happy as well with her new shoes.


Materials needed:
1. a pair of canvas shoes
2. masking tape
3. small bottle of glitter
4. small bottle of fabric glue
5. round paint brush
6. crafting glue (Elmer's)
7. sealant

I already have tape, paint brush, crafting glue, and sealant in my craft stash, and my total spending was 275 pesos.


Wednesday, February 25, 2015

Gourmet(?!) Tuyo In Oil

Madear and Fadear sent us so many packs of tuyo and tinapa, but the former was so salty, medyo naawa ako sa kidneys namin. Ayoko namang itapon. Waste not, want not. And you know me, Ms. Make Do, Ms. Improvise, Ms. I-have-a-solution-for-that. My (delicious) solution? Gourmet tuyo in oil.

1. Lightly fry the tuyo in corn oil. (You can use canola or sunflower or any other oil that doesn't taste nutty). After frying, let the tuyo soak in oil. I did that to get as much salt off as possible. Then I drained the oil.


2. Remove the scales by firmly holding it by the tail and running a knife just underneath the scales from above the tail going up toward the head. If properly fried and soaked, it should be easy to remove. After removing the scales, fillet and remove the bones. Arrange the fillets in a bottle.


3. In a saucepan, add a bit of oil and sauté minced garlic. When the garlic is transluscent, add sun-dried tomatoes, chili flakes, ground pepper, whole black pepper, and olives. You can add capers as well. Be sure to wash the olives to remove the saltiness. Turn down the heat to avoid burning the garlic.  Add half a cup of corn oil, half a cup of olive oil, and one-third cup of vinegar. Let this simmer for a few minutes. Turn off the fire and let the mixture cool.


4. Pour over the tuyo fillets. Let it rest a bit to let the flavor of the oil seep through the fillets.


Et voila!


I was supposed to give away the other jar, pero sorry, masarap eh, and naubos agad namin yung isang bottle and wanted more. :) Soweeee... Di bale, pag-uwi ko sa Bulacan sa April, I'll buy lots of tuyo and make one na pang-giveaway.

Thursday, February 19, 2015

2015 Feeling PiP Semi-DIY Planner

For the first time in years, I didn't buy a planner. At first, I thought of buying refills for my old planner, but TheHusband implied, or rather led me to believe, that he was getting me a Kate Spade planner. Kasi I manage all our bills, and I saw he charged something sa Kate Spade. So I told him that I already know he was getting me something from Kate Spade for Christmas and I asked if it's the journal I liked. Oo daw. Ako naman, si uto-uto, naniwala kaagad. So hindi na ako bumili ng planner. By the time I realized na hindi planner (it was a Gramercy locket watch, if you're curious), it was a bit late to order refills na, kasi it's coming from Taiwan pa and takes like a month. Although Derdo gave me a mom planner [thank you, Derdo!!!], which I solely devoted to my mommy duties, I still needed something that I can bring along with me everywhere.

TheHusband gave me one of the planners he got last Pasko. I don't wanna sound ungrateful, pero di talaga appealing sa akin ang hitsura nung planner. Sorry. I mean faux ostrich in plastic? So not me. I want it flamboyant! Colorful! Bright! Happy! Not brown. In short, KSP.


No recourse but to DIY the "prettification." I downloaded this charming PiP wallpaper and printed it on a textured low-grammage board. I used a low-density paper because I'm retaining the original cardboard cover of the planner and I don't want the extra weight or bulk. Unfortunately, it can only cover the front part of the planner, but it's okay, I can live with that. I used another piece of textured board for the back cover. I then pasted them together over the planner's cardboard cover using contact cement (rugby). I didn't want to use water-based glue, as it might seep into the paper board and ruin the print. Hayun, amoy-rugby yung planner pagkatapos.*High*


I first mitered the corner of the cover to remove extra bulk, then proceeded to round them out using my ever-trusty Carl corner rounder to go with the rounded corners of the pages. Seriously, it's one of my most favorite crafting tools, along with my hammer-on punchers, super-cheap self-healing cutting mat, and Carl and Fiskars cutters.

I then covered it with iron-on flexible vinyl. It was a flea market find, and I hoped there would be more rolls available. Alas, it was the only one. So ngayon, tipid na tipid ang gamit because I'm reserving the rest for another project. I then covered the inside with another low-grammage board, but non-textured this time. I first folded it into two and cut its sides (except the side attached to the spine), but a bit smaller in dimension (by ~2 mm) than the cover. Then I attached one of the folded leaf to the inside cover. I did the same for the other cover.


It looked bubbly at first, but when I ironed it over, it molded itself to the texture of the paper.


So here's the finished product. I'm so happy how it turned out. Happier still that I didn't have to buy a planner.

et voila!


PS: I promised Baan that I'd post this last night, but I had my annual eye checkup yesterday, and the doctor did a further test, a test that involved dilating my pupils. So for about four to five hours yesterday afternoon till the evening, my eyesight was blurry and the lights seemed to glare harshly. Back in the doctor's office, it seemed okay, but going home, it felt a bit disconcerting. Sus, ang haba ng paliwanag ko. Punta na nga lang ako sa presinto. :)


Sunday, August 31, 2014

"Faux" Pastillas De Leche


I call this "faux" pastillas de leche because it's not the traditional way of making pastillas de leche. That doesn't mean it's actually fake and inedible. Masarap naman, but it's way too sweet for my taste. And for the remaining pastillas de leche purists out there, I have the recipe for the traditional one as well.

Faux Pastillas de Leche

Ingredients
1 medium pack of unsweetened powdered milk (~2.5 cups)
1 small condensed milk
0.5 c sugar for rolling


1. Mix the powdered milk with the condensed milk until it looks like a dough.
2. Form into half-inch balls, then roll into little logs.
3. Roll the logs on the sugar.
4. Cover the logs with parchment paper or even bond paper cut into 2x3-inch rectangles.
5. Wrap the paper-covered pastillas with papel de japon.

You don't have to decorate it -- it's just a wrapper after all. However, I'm a sucker for good packaging, and because it was Sharkteeth's Linggo ng Wika food contribution, I thought making it look nice wouldn't hurt. Instead of the traditional way of cutting the paper into lace-like patterns, I just used my old puncher to decorate the scalloped edges. Ganyan talaga ang mga harassed na nanays, kung ano-anong shortcuts ang natututunang gawin. Hahahaha! I was able to finish this in less than an hour, from the mixing to the arranging in a wicker basket. *Triumph for the harassed nanays!*

For the traditional way of making pastillas de leche, you need 1.5-2 liters of fresh milk and sugar for rolling. Just simmer the milk, stirring continuously until it is reduced to about a quarter or a third of the original quantity of milk. You'd know when it's done when it is starting to look like a ball of soft dough. Remove from the pan and let it cool, then follow steps 2 to 4.

My mother used to make pastillas the traditional way, which entails using the freshest milk from our mama cow. (
The fresh milk makes all the difference. It tastes so much better than the "faux" kind.) It's a labor of love -- it takes hours to simmer and reduce the milk, while stirring the whole time. It starts off easy, but when the milk is starting to reduce and ball up, it can be a drag, literally!

I might try doing this one of these days if I'm able to get fresh milk from the local dairy.

♥♥♥

Sharkteeth in her Muslim princess costume for Linggo ng Wika


Thursday, May 22, 2014

Kitchen Prettification

I wallpapered the kitchen ledge of the apartment, and I must say it did prettify that little space. I spent 65 pesos for the vinyl sticker and about 10 minutes to install it. Et voilà


I don't want to admit this, because I used to mock my mom's escaparate full of plates and cups and saucers she rarely uses, but I would really love to have a little vitrine where I can showcase my mugs and mismatched cups and saucers. I wanted to say that it's a collection, but it isn't. I'm not really obsessing about them, yet, and I don't want to, actually. I have the makings, and the genetic predisposition, I suppose, of a hoarder and I don't want to further fuel the fire. I still have a lot left in our Laguna home, specifically the floral and avian set I got from Gourdo's, but I didn't want to lug everything when we moved here, so I just brought a few.

Tangent thought: The Buddhist way must feel so good and freeing, not being "tied" down to material things. I'm trying, sometimes in vain, but I am trying.

Thursday, May 08, 2014

DIY Sun-Dried Tomatoes

As I mentioned in my Instagram, when life gives you tomatoes and sunshine, you make sun-dried tomatoes. Corny, I know, I know. I'm not exactly Tina Fey or Mindy Kaling. Summer-harvested tomatoes are usually plump and red, and very cheap, if I might add. I made a batch back in 2011, which was delicious, but being drizzled with olive oil, it turned rancid a few months later. So I wouldn't suggest olive oil if you're going to store them.

1. Use ripe and plump tomatoes.


2.  I quartered and de-seeded them, but I suggest that you just halve them. Once they dry, quartered pieces are too small for snacking. Yes, I snack on them. But if you are just going to add them to dishes, quartered pieces are fine, and it dries faster.


3. Sprinkle salt on the baking pan. A friend suggested that I use a bilao for better ventilation. I don't have any, so... Lay all the quartered pieces, inside up, and sprinkle salt again. You can sprinkle herbs as well, but I want to keep my options open. I covered this with a "table-top umbrella," you know, those screened thingies used to cover food on the dining table.


4. It's either the particularly hotter summer or using quartered, instead of halved, pieces that made drying so much faster. I remember the 2011 batch took me a couple of weeks, but this batch only took me a few days.


5. Et voilà! Cheap sun-dried tomatoes -- perfect for pasta and snacking. By the way, that tray-full of tomatoes? It only filled half a cup. Might have been able to fill three quarters, but I already snacked on a few pieces. Seriously, ako lang ba ang nagpapapak ng sun-dried tomatoes? Weirdo!


PS
I only used perfect tomatoes for drying. All those with bumps, I sliced off the bumpy parts and chopped them, then I added the pulp I removed from the quartered ones (those for drying). I added a cup of water and a bit of salt and boiled it. After boiling, I cooled and placed it in ice trays. When you need just a bit of tomato sauce,  you can just break off a couple of tomato cubes. Easy-peasy.
PPS

I apologize for the quality of the pictures. Seriously, I cannot take good pictures if my life depended on it. Can anybody teach me the easy way to take good pictures + editing using iPhone 4? Keyword is easy. Please lang.

Monday, March 17, 2014

DIY Hermès Twilly-Style Scarves

What's a poor girl to do when she's hankering for something designer whose price is equal to weeks' worth of the family food budget? DIY, of course! :) My latest DIY project is an Hermès Twilly-style scarf, well, actually, two scarves, as I'm going to use them to cover the handles of my bag.

♥♥♥ 

Materials:
40x12" silk scarf
40x5" cotton lining (optional)
red rayon thread
scissors
cutter (optional)
flat iron
sewing machine (you easily hand stitch this)


Monday, January 17, 2011

Chicken Nuggets

Sharkteeth is addicted to chicken nuggets, and I find it a bit alarming because of the preservatives. What to do? What to do? Of course, the answer is clear---make one! Hitting the Internet for recipes, I was quickly flummoxed by the numerous variations (herbs, cheese, etc) and other simplistic suggestions, I mean, "add seasonings"? Seriously? What seasonings? In the end, I did it using the only way I know---improvise!!! You know what that means, right? I can't give you the exact measurements...


Ingredients

Nuggets:
    1/2 kg ground chicken
    ~1/2 cup Parmesan cheese
    a few grates of cheddar cheese
    bread crumbs (I just placed a couple of sliced bread in the blender)
    2 eggs
    a pinch of mixed dried herbs (thyme, rosemary, and oregano)
    a couple of pinches of paprika
    salt, pepper, and MSG

Breading:
    blended bread crumbs and small pack of corn flakes
    salt and pepper
    a few shakes of Parmesan cheese


1. Just mix the nugget ingredients.
2. Get a small ball (half a golf ball).
3. Roll on the breading mix.
4. Form the shape you want. (For the record, the nugget on the lower right is an elephant. Yes, it is. IT IS AN ELEPHANT!)
5. I placed each nugget on individual foil squares and refrigerated them to keep their shape.
6. Fry on low heat to avoid burning the coating and ensuring an evenly cooked nugget. Oh, what the heck, just cook it the way you're used to---it's not rocket science.

Sharkteeth's verdict: "Wow, Mymy, sarap!" 

Thursday, October 02, 2008

Ooh-La-La-Lamp!

As promised, fewer me-me-me posts and more arts and crafts. And here's to fulfilling the promise!

The first lamp (lamp A), made of wire and wood with its shade stripped off, was a freebie/prize I got when I inquired about a loan years back when I was still in my former place of employment (would henceforth be referred to as FPE). It's been shoved in the kitchen cabinet, sharing the gloomy darkness with old empty bottles of Asti and Bailey's, waiting for some kind inspiration. I digress. The second one (lamp B), actually intended for candles, I got from Papemelroti. Imagine that? Papemelroti is still alive. It's been producing recycled-themed items since I was in high school, and that, my dear readers, was verrrry long time ago.

Here are the basic steps.*


1. Get the light mechanism and rubber feet off lamp A. Thanks to TheHusband for unscrewing the light mechanism.
2. Drill a hole at the base of lamp B. Hehehe, first time to use the drill, and I sure felt girl-power-y/feminist-y (I'm not even one) wielding it. Drill today, chainsaw tomorrow! Girlz rule!
3. Install the light mechanism and rubber feet on lamp B. I covered all exposed metal, you know, just in case someone (READ: Sharkteeth) decides to stick her hand in, and I don't think I'd be surprised if she does---I once stuck a corned beef can key into an electrical outlet. Got shocked in more ways that one. Must be the reason for MY hair.
4. Trace and cut the shape of lamp B on a translucent fabric, one for each side. I used an old curtain.
5. Paste the fabric on each side. Let dry. By the way, I used SewNoMore. It's terrible to use on clothing, but it worked great on this project. I'm thinking of covering up the edges of the fabric with some sort of trimming lace/cord. Maybe this weekend.
6. Turn off all the lights for maximum drama and light this lamp up!

Of course, by this time, TheHusband and Sharkteeth already know the drill and know exactly when to "ooohh!," "aaahh!," "wow!, " and "ganda, Mymy!" without being prodded.


*You'll need a drill, a screwdriver, electrical tape, very sticky glue, and lots of poise and grace while wielding that frickin' heavy drill.